Thursday, April 17, 2014

Hping3 Reflection

    This final blog post will summarize my findings on my Capstone project on Hping3 forensics. Since my research portion was finished in the last blog post this post will focus on obscuring the data, catching the data using an intrusion detection system (IDS), and why this information is significant.

Obscuring the Data


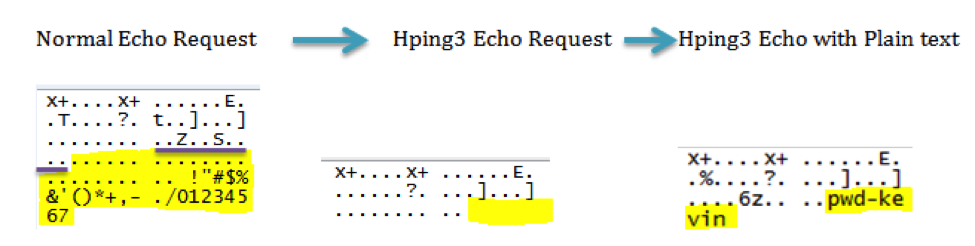
    Hping3 has the ability to send entire documents through ICMP packets. In order to better obscure this data there are two ways that are ideal for data to sent over the network covertly. The first is setting a specific amount of bytes of data per packet. The two sizes that would be the lease suspicious would be one and forty-eight bytes. One byte would be ideal because of the size of the packet. A small ICMP packet is not an unusual, and would not raise suspicion. Forty-eight bytes on the other hand is the normal size of data found in an ICMP echo request. By matching an echo request size any IDS would not flag the packet based on its size.

    Below is command typed to send a document (test) through to an IP address (216.93.147.70) at one byte at a time (-d 1).

    The second way to better obscure the data being sent out is through delaying each request. By delaying request with data in them it slowly sends data out rather than all at once. It would be harder to catch data being sent out over a day than it would be in thirty seconds. 


Using an IDS

    In order to protect information an IDS can be used to catch Hping3. During testing Wireshark 1.10.2 was used not only to capture network packets, but also was used as an IDS. The following parameters were created to help filter legitimate packets from Hping3 packets.

    The first parameter was data =! 48. This would filter all packets that did not equal forty-eight bytes. This would catch any packet data that was not a normal ICMP packet. Although not all legitimate packets will be forty-eight bytes, it is a good parameter to set for catching nefarious ICMP traffic.
    The second parameter is timestamp = present. This parameter will filter all traffic with timestamps in their headers. Hping3 does not generate a timestamp when it sends an ICMP packet. You use the time stamp parameter to find non-hping3 packets, and the remainder packets should be inspected closer.
    These two parameters together would help detect and catch Hping3 packets leaving or entering a network both live, and as saved log files.

Significance


    The significance of my project had two primary goals. The first is to make people more aware of the simplicity and ease of creating covert channels that can move important data off of a network, and for companies to be aware of how the software works. The other significant reason for this research would be helpful for investigators to know where to look both on a local machine and on the network to find this software or similar network exfiltration tool. Greater exposure on both where to find artifacts, and how to use an IDS to catch use of this software could save time, and money. These reasons are why this project is significant, and hope that this information can help mitigate data theft.

Thursday, March 13, 2014

Hping3 Forensic Aritfacts


Updates

Since the first blog post there have been considerable changes and progress to my Capstone project. After working with DNS covert channel forensics, it became clear that the project was too large to fully complete within four months. With that realization I still wanted to have my new project focus around covert channeling. I then found a program called Hping3 and decided to have my capstone focus around finding artifacts on hping3 when used to send data via cover channeling.

Once I switched my project to hping3 I started researching the program and testing its capabilities.  Hping3 is a command line based tool that can be used to troubleshoot and test networks and hosts. In addition to its ability to test network connection and help a company, it also has the capabilities to send information through different network protocols. My tests done so far have been tested on IP, ICMP, and UDP.

The Research

The first part of setting up to test this program was to create two separate VM machines on two separate local machines. Both of these machines are running Ubuntu 12.04.4. I then imaged them to create a control for comparison after running hping3.


After the snapshot I then created sample data which consists of three test documents, and they are located on the desktop. In addition to that I downloaded hping3.


At this point all further steps moved to the command line (Terminal). Below is the command to install hping3 from the desktop.


Sending Plain Text

Test 1

My first set of tests involved sending data though ICMP echo requests. Here is a normal echo request that was captured using Wireshark.


The underlined blue is the size of the packet which is 84 bytes. The underlined purple is a timestamp for the data being sent across, and the hex values bracketed within the red is the actual data being sent across.


Test 2

Below was an ICMP echo request sent using hping3. The packet was captured using Wireshark.


The underlined hex values are resent that this packet is an IP packet (08 00); it has a size of twenty-eight bytes (00 1C) the source (28 5d 93 c3) and destination IP (d8 5d 93 b8), and it contains the type of ICMP packet send which is an echo request which is represented by the 08 00 in the hex.


Test 3

Lastly I sent data though plain text using hping3. The command I used was Sudo hping3 -1 216.93.147.184 –e pwd-kevin. The captured packet after being sent looked like this.


The underline green represents important changes to the packet compared to the previous hping3 echo request.  The first is the size of the packet. It went from twenty-eight bytes to thirty seven. The added nine bytes are from the plain text data pwd-kevin. The last nine bytes are the plain text data I entered into my command.


Results

The primary differences noticed are the data strings. These are highlighted in yellow. The other difference is that hping3 does not timestamp the data. 


With the time remaining to work on my project I am going to analyze an image of the VM I have been working on to see what data is stored on the machine. After I discover what is stored I will repeat the process for sending hex messages through hping3 and also sending entire text documents through hping3.


Wednesday, January 22, 2014

A Little Introduction

   Hello blog viewing world! My name is Kevin Nickerson and I am a senior in the Computer and Digital Forensics major here at Champlain College. This blog is part of my Senior Capstone Class that involves research and contribution to the field of computer forensics. This is my first of several blog posts about the work I have started on Covert Channel Forensics.

Covert Channeling hides exfiltrated data in DNS Headers 
(Picture from Erik Couture article below)


Here is the breakdown of my goals for the Capstone project thus far:

- Research Covert Channels (Sans.org article by Erik Couture on Covert Channels)

- Create a Windows 2008 Server and two Windows 7 virtual machines

- Generate sample data to push through the covert channels

- Image the virtual machines before and after the covert channel connection

- Compare between these three images and see if the channels leave behind evidence for an investigator to find.

As my project evolves I will update my goals and results for all of you awesome blog readers out there!

    Why Mainely Forensics? Well, I grew up and love Maine, get the pun, and will primarily be posting about my research I am doing on Covert Channel Forensics.  During my fifteen-week research I will blog about my forensic progress.  Although that is the main point of this blog, but I will also be posting about place I have travel to, and recommendations on places to visit. 


Recommendation #1


   Green fields, partly cloudy sky, and sheep. That's right it's Northern Ireland! If you are ever headed for a trip there I would recommend a few days to explore the beautiful views of Ballintoy. Walk about, and find Carrick-a-Rede Rope Bridge and go on an adventure!